CSS-only Image Annotation
I keep hearing about flickr and its
image annotation features. It never seemed to work on my computer,
so I've been more interested in the few home-brew alternatives that have
been floating around. Scribbling.net
talks about annotating with
DHTML, and there is something on Kryogenix about doing it
with DOM, but to be fair, the only internet technology I know anything
about is CSS. So I decided to put together something that would let me
annotate images using only the basics: CSS and HTML. Before starting, you
should know that none of these have any effect in Internet Explorer, so if that's
your thing, you won't be getting much out of this article.
[Update] Nov 26, 2004 - Frank Manno has put together
this
interesting method using an image slicing technique. Uses CSS only, or
optionally Javascript. (Also, I made a few changes to this page, so that the
CSS is visible.)
[Update] Feb 16, 2005 - I have finally gotten around to
trying out flickr, and I think that I hadn't quite grasped the whole flickr
'thing' when I wrote this up. This may come across as you read the article.
Also, the prolific Stu Nicholls
has provided a CSS design similar to the ones on this page, with the major
difference that his method is supported in recent versions of IE.
[Update] Mar 25, 2005 - I made an
actual note editor. This is a
server-side thing that lets you add real annotations in Fotonotes format to
jpeg images on the same server, then display the notes automatically with
CSS similar to what I wrote about here. You should look at that
instead of at this.
[Update] Feb 18, 2018 - I relocated these files to
freeshell from their former home at a now-defunct host.
Option #1
Unsurprisingly, I'm not the first person to play around with this from a
CSS-only point of view. An
example of CSS image
annotation is up over on moryson.net, and I used that as a
starting point. Hovering over the image causes note box anchors to appear,
and hovering over an anchor displays the content of the note. (With the
original method, the anchors are visible all the time, and that one should
work fine in Explorer.) The HTML that I started from follows. For other
examples, see the source.
<ul id="group1">
<li id="jason1"><span>Jason</span></li>
<li id="marty1"><span>Marty</span></li>
<li id="merle1"><span>Merle</span></li>
<li id="jon1"><span>Jon</span></li>
<li id="mike1"><span>Mike</span></li>
<li id="brad1"><span>Brad</span></li>
<li id="roger1"><span>Roger</span></li>
<li id="ehler1"><span>Ehler</span></li>
</ul>
The entire thing is simply an unordered list with the image
I want to use as the <ul> background and the note boxes positioned
appropriately using css. I also wanted a translucent highlight area, like
the kryogenix method uses, so I use a 55% transparent white png as the
background of the note box. I didn't change a lot, really, and here's what it
looks like:
#group1 {
  display: block;
  width: 570px;
  height: 380px;
  margin: 0;
  padding: 0;
  background: url(DSC03221.jpg) no-repeat; }
#group1 li {
  visibility: hidden;
  list-style-type: none;
  position: relative; }
#group1 a {
  display: block;
  position: relative;
  font-family: sans-serif;
  font-weight: bold;
  color: #000;
  width: 20px;
  height: 26px;
  line-height: 26px;
  background: url(55w.png);
  border: 1px solid black;
  text-decoration: none;
  overflow: hidden; }
#group1 a span { visibility: hidden; margin-right: 23px; }
#group1:hover li { visibility: visible; }
#group1:hover a:hover {
  text-align: right;
  width: 80px;
  left: -60px; }
#group1:hover a:hover span { visibility: visible; }
#jason1 { left: 60px; top: 110px; }
#marty1 { left: 180px; top: 105px; }
#merle1 { left: 265px; top: 45px; }
#jon1 { left: 450px; top: 25px; }
#mike1 { left: 200px; top: 180px; }
#brad1 { left: 300px; top: 130px; }
#roger1 { left: 400px; top: -20px; }
#ehler1 { left: 515px; top: -55px; }
Option #2
There are two main problems with the method above. On moryson, the tags
are positioned absolutely on the page. That's totally non-flexible. I
positioned mine relatively, but that still meant that I was adjusting
vertically for the height of each note box as it tries to flow under its
predecessor. To fix this, I had to enclose the list in a in a
position:relative div, which "resets" the origin for its child elements and
lets me position the note boxes absolutely, using the upper left corner as
0,0 coordinates. It would be nice if there was a way to achieve this
without using an otherwise unnecessary div, but if there is, I couldn't get it.
Secondly, I took the image out of the <ul> background and put it into the page
the usual way. That way you can easily define alt text for the image, and
also get the proper context menu when right clicking on the image.
Now that the boxes can be positioned absolutely, it's easier to place them
and give them different sizes without each adjustment throwing off all the
rest. If I had a paragraph of text that I wanted to stick in each box, this
would be an adequate way to do it. Covering up what you're trying to read
about, however, is a bit of a problem here. Also, a definition list would
probably be more appropriate for this.
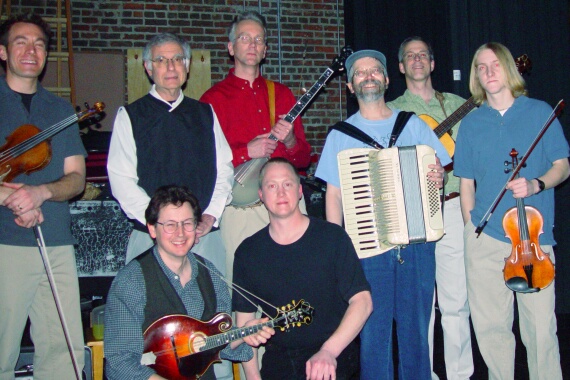
- Jason
Recently selected as the Grand Champion Fiddler at the 2001 Iowa State Fair.
- Marty
He bought a bass, learned how to play it, and in 1975 was one of the founders of the Skunk River Bluegrass Band.
- Merle
Undoubtedly Iowa's leading exponent of the claw-hammer style of 5-string banjo
- Jon
Plays guitar and serves as recording and production engineer.
- Mike
Cut his musical teeth playing the mysterious octalute in a family string band
- Brad
Played various instruments since age six, and settled on the mandolin as his life instrument as a teenager
- Roger
Helped start the Central Iowa Barn Dance Assn. and recruited members of the Barn Owl Band
- Ehler
Began classical violin lessons at the age of five and started playing old-time fiddle at eleven.
#group2 {
  display: block;
  position: relative;
  width: 570px;
  height: 380px;
  margin: 0;
  padding: 0; }
#group2 li {
  visibility: hidden;
  list-style-type: none;
  position: absolute;
  background: url(25w.png);
  border: 1px solid black;
  font-family: sans-serif;
  font-size: x-small;
  color: #000;
  padding: 0;
  line-height: 1.3em;
  overflow: hidden; }
#group2 span {
  visibility: hidden;
  position: absolute;
  left: 0;
  right: 0;
  display: block;
  padding: 5px; }
#group2:hover li { visibility: visible; }
#group2 li:hover { background: url(65w.png);}
#group2 li:hover span {visibility: visible;}
#jason2 { left: 1px; top: 15px; width: 100px; height: 200px; }
#marty2 { left: 110px; top: 30px; width: 100px; height: 150px;}
#merle2 { left: 215px; top: 15px; width: 90px; height: 140px;}
#jon2 { left: 395px; top: 25px; width: 60px; height: 120px;}
#mike2 { left: 120px; top: 190px; width: 100px; height: 160px;}
#brad2 { left: 235px; top: 160px; width: 105px; height: 165px;}
#roger2 { left: 310px; top: 30px; width: 80px; height: 125px;}
#ehler2 { left: 460px; top: 30px; width: 80px; height: 160px;}
Option #3
I don't need to include all that information, though; I'll show the name
only. Since the name alone doesn't take
up much space on the picture, so there's no real reason to hide them all the
time. In this implementation, hovering over the photo causes all text boxes
to fully display.
- Jason
- Marty
- Merle
- Jon
- Mike
- Brad
- Roger
- Ehler
#group3 {
  display: block;
  position: relative;
  width: 570px;
  height: 380px;
  margin: 0;
  padding: 0; }
#group3 ul { margin: 0; padding: 0; }
#group3 li {
  visibility: hidden;
  list-style-type: none;
  position: absolute;
  display: block;
  margin: 0;
  padding: 0;
  font-family: sans-serif;
  font-weight: bold;
  color: #000;
  height: 26px;
  line-height: 26px;
  text-align: center;
  background: url(55w.png);
  border: 1px solid black;
  text-decoration: none;
  overflow: hidden; }
#group3:hover li { visibility: visible; }
#jason3 { left: 10px; top: 110px; width: 80px; }
#marty3 { left: 130px; top: 145px; width: 80px; }
#merle3 { left: 215px; top: 105px; width: 80px; }
#jon3 { left: 400px; top: 105px; width: 60px; }
#mike3 { left: 150px; top: 290px; width: 80px; }
#brad3 { left: 260px; top: 270px; width: 80px; }
#roger3 { left: 350px; top: 150px; width: 80px; }
#ehler3 { left: 470px; top: 145px; width: 80px; }
Option #4
I do want to show a little more than a name, though, and still keep the
face visible as well. It's not too difficult to restrict the text to the
lower end of the box and clear up the rest for easy visibility. In a
perfect world, the entire area of each box would be a link to more information
about the individual, but <li> tags are not allowed inside of
<a> tags, so only
the lower span can act as a link.
#group4 {
  display: block;
  position: relative;
  width: 570px;
  height: 380px;
  margin: 0;
  padding: 0; }
#group4 li {
  visibility: hidden;
  list-style-type: none;
  position: absolute;
  background: url(25w.png);
  border: 1px solid black;
  font-family: sans-serif;
  font-size: small;
  color: #000;
  padding: 0;
  line-height: 1.3em;
  overflow: hidden; }
#group4 span {
  visibility: hidden;
  display: block;
  width: 100%;
  padding: 5px;
  background: url(65w.png);
  position: absolute; bottom: 0; }
#group4 a { text-decoration: none; color: #000; }
#group4:hover li { visibility: visible; }
#group4 li:hover { background: transparent; border-color: #fff; }
#group4 li:hover span {visibility: visible;}
#jason4 { left: 1px; top: 15px; width: 100px; height: 200px; }
#marty4 { left: 110px; top: 30px; width: 100px; height: 150px;}
#merle4 { left: 215px; top: 15px; width: 90px; height: 140px;}
#jon4 { left: 395px; top: 25px; width: 60px; height: 120px;}
#mike4 { left: 120px; top: 190px; width: 100px; height: 160px;}
#brad4 { left: 235px; top: 160px; width: 105px; height: 165px;}
#roger4 { left: 330px; top: 30px; width: 60px; height: 125px;}
#ehler4 { left: 460px; top: 30px; width: 80px; height: 160px;}
Option #5
This works well enough for this picture, but for real annotation, you
probably want to use more text than will necessarily fit in the space that
you're annotating. Setting a title element on the list item works alright,
Firefox only displays the first 64 or so characters.
Another problem with this is that titles won't display
in a text-only browser. You can get around the second by duplicating the text
from the title tag into a hidden span in the list item. A graphical browser
won't display it, but it will show up in a text-only browser.
- Jason. Recently selected as the Grand Champion Fiddler at the 2001 Iowa State Fair.
- Marty. He bought a bass, learned how to play it, and in 1975 was one of the founders of the Skunk River Bluegrass Band.
- Merle. Undoubtedly Iowa's leading exponent of the claw-hammer style of 5-string banjo
- Jon. Plays guitar and serves as recording and production engineer.
- Mike. Cut his musical teeth playing the mysterious octalute in a family string band
- Brad. Played various instruments since age six, and settled on the mandolin as his life instrument as a teenager
- Roger. In 1991 he helped start the Central Iowa Barn Dance Association and recruited the musicians who in 1994 named themselves The Barn Owl Band
- Ehler. Began classical violin lessons at the age of five and started playing old-time at eleven.
#group5 {
  display: block;
  position: relative;
  width: 570px;
  height: 380px;
  margin: 0;
  padding: 0; }
#group5 li {
  visibility: hidden;
  list-style-type: none;
  position: absolute;
  background: url(25w.png);
  border: 1px solid black;
  font-family: sans-serif;
  font-size: small;
  color: #000;
  padding: 0;
  line-height: 1.3em;
  overflow: hidden; }
#group5 span {
  visibility: hidden;
  display: block;
  width: 100%;
  padding: 5px; }
#group5:hover li { visibility: visible; }
#group5 li:hover { background: transparent; border-color: #fff; }
#jason5 { left: 1px; top: 15px; width: 100px; height: 200px; }
#marty5 { left: 110px; top: 30px; width: 100px; height: 150px;}
#merle5 { left: 215px; top: 15px; width: 90px; height: 140px;}
#jon5 { left: 395px; top: 25px; width: 60px; height: 120px;}
#mike5 { left: 120px; top: 190px; width: 100px; height: 160px;}
#brad5 { left: 235px; top: 160px; width: 105px; height: 165px;}
#roger5 { left: 330px; top: 30px; width: 60px; height: 125px;}
#ehler5 { left: 460px; top: 30px; width: 80px; height: 160px;}
Addendum
The reason that none of this works in Explorer seems to be that only
<a>
tags can take a hover element. I tried to redo it with only nested
<a> tags,
but couldn't get it to work. With the release of Firefox 1.0, I guess it's
well past time to stop catering to Explorer, though. Of course, even if the
hovering could be fixed, last I knew Explorer couldn't handle alpha channels
on pngs, either, so everywhere that shows a nice translucency would be
replaced with flat white, covering the picture.
Send email to ehall at freeshell dot org if you like. Please do not send email to
samplar@gmail.com or samplor@gmail.com
thank you.
November 13, 2004
Except for the photo (copyright Rob Louden), the free
distribution of this page or its contents is granted unconditionally. If
old-time dance music interests you, take a look at The Barn Owl Band.